Setting a Solari Dator 5
30 June 2024
In general, the setting procedure is to go from small units, to large, to small again. This is because the larger units are easier to set when the smaller units are zeroed out.
1. Set minutes to 00
2. Set hour to 0
3. Set date to 1
4. Set month correctly
5. Set date correctly
6. Set weekday correctly
7. Set hour correctly
8. Set minute correctly
9. Connect to mains power
We can proceed through those steps, though we will need to pause at some points to address problems with your clock.
1. Setting the minutes to 00
I am unfamiliar with your minutes mechanism, but I think you press here, and release:
This should advance the minutes until this cam falls, like so:
At this point, your minutes should read 00. If they read 10, 20, 30, 40, or 50, you can fix the “tens” by pressing and releasing this lever until it reads 00:
2. Setting the hours to 0
Press this lever to the right, and release:
As it releases, it will pull on this hour wheel, and advance the hour. (My wheel is plastic, but the function is the same.)
You have trouble here, because your flaps are folding the wrong way. They are folding fowards, which is a good sign because it means the flap springs are healthy. But you must get this tab to hold them back, so that only one number is shown.
The answer is to hold the flaps back while you set the hours forward. You can do this from the back side, like so:
If this is troublesome, you can remove the front plastic and hold them back from the front side. If you want to do this, I can send separate instructions.
When the flaps have gone around once, they should be held by the tab.
Now you should set the hours to 0. Advance the hour until the lever rests on the pins like this, with pins on the right, and no pins on the left.
Now, the hours should read 0. If they read 10 or 20, use the same “tens” correction as above.
3. Set date to 1
This is done by pressing down on this piece here, and releasing:
I see that your date shows the same problem as the hour, where the flaps fold the wrong way. Use the same procedure to correct them.
Once the flaps are held correctly, advance the date until the month changes. At that time, the date should read 1. If it reads 11, 21 or 31, use the same “tens” correction as above.
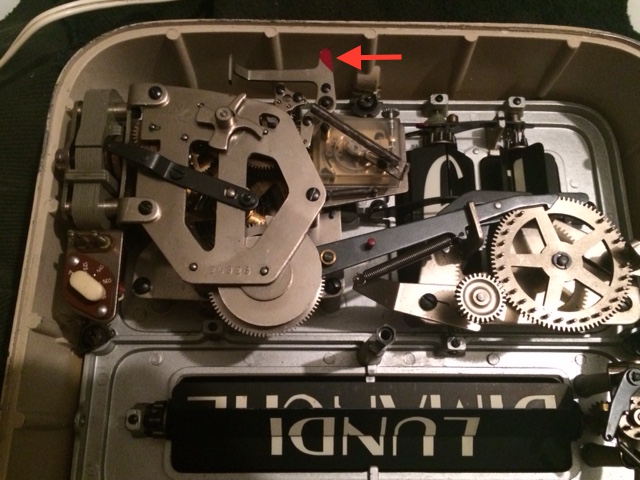
4. Set month correctly
Push this lever (painted red) toward the front of the clock, and hold. While holding, you can rotate the month wheel:
Rotate until the correct month lines up with the 1 on the smaller black dial:
Note that there are four years’ worth of months, to account for leap year. This is indicated in red – and we are in a leap year, so use the red months!
Then release the lever. Make sure its attached gear engages with both gears below.
Now look at the month displayed on the clock. If it disagrees with the month selected on the dial, pull and release this lever until they agree.
5. Set date correctly
Press the same lever from step 3 until the date is correct.
6. Set weekday correctly
Turn this wheel counterclockwise until the weekday is correct. You will need to use the same procedure as hours and date to make the flaps held by the tab.
7. Set hour correctly
Press the same lever from step 2 until the hour is correct.
8. Set minute correctly
Press the same lever from steo 1 until the minute is correct.
9. Connect to mains power
I am not certain what happens at this point, as I have not handled a Solari that winds itself, as yours does. But I expect, when you set the correct voltage and plug it in, it will wind itself and begin ticking. You may need to wait a few minutes, and then advance the minutes (as Step 8) to the correct minute.